Troubleshooting
Troubleshooting & Fixes
If you find yourself unable to connect to the network, or you are experiencing a slow or otherwise poor network connection, here is a list of common solutions to try.
- Forget the Network
- Disabling Your Proxy
- Set the Appropriate Network Settings
There are a number of things you can do in a short amount of time that can improve your computer’s performance on the ResTek network.
- Defragment your Hard Drive
- CCleaner
- Update your Computer
- Repair your Mac OS X Disk Permissions
- Clear your browser’s Cookies and Cache
Disabling Your PROXY
In order to improve the speed of your Internet connection, these instructions guide you through disabling the proxy. If you are using these instructions to troubleshoot your connection, you should open your web browser and attempt to visit a website once you have saved your changes.
Windows
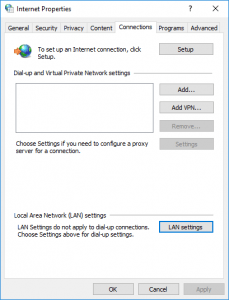
- Go to Control Panel > Network and Internet > Internet Options.
- Select the Connections tab.
- Click the LAN Settings… button.
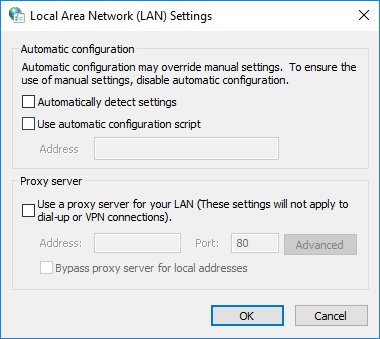
4. Make sure Automatically detect settings is unchecked and click OK to save your settings.
5. Close and reopen your browser to ensure the changes go into effect.
Mac
- Go to Apple > System Preferences > Network.
- Click on Advanced….
- Click the Proxies tab.
- Uncheck Auto Proxy Discovery
- Click OK.
- Click Apply.
Defragment Your Hard Drive
Fragmentation makes your hard disk do extra work that can slow down your computer. Disk Defragmenter rearranges fragmented data so your hard disk can work more efficiently. Disk Defragmenter runs on a schedule, but you can also defragment your hard disk manually.
- Open Disk Defragmenter by clicking the Start button , clicking All Programs, clicking Accessories, clicking System Tools, and then clicking Disk Defragmenter. If you are prompted for an administrator password or confirmation, type the password or provide confirmation.
- Click Defragment Now.
CCleaner
CCleaner is the number-one tool for cleaning your computer. It protects your privacy online and makes your computer faster and more secure. Easy to use and a small, fast download.
You can download it here for Windows and here for Mac OSX.
Update Your Computer
Keeping your computer software up-to-date keeps it running smoothly and efficiently. To update your PC or Mac, you’ll need to be connected to the internet.
Windows Updates
Windows Updates are small downloads created by Microsoft to repair flaws in the Windows software. These updates help to protect against known security threats. Microsoft releases security-related updates the second Tuesday of every month. If there is a security threat, such as a widespread virus or worm that affects Windows computers, Microsoft will release a security update to fix the problem as soon as it is available.
You can install Windows Updates by visiting the Windows Update website, or by setting your computer to automatically download and install the updates. The difference is that automatic updates install only the critical updates for your computer, while visiting the Windows Update website allows you to install optional updates.
Instructions
Here’s how you can bring your computer up to date now.
You can also use these instructions to keep up with the latest non-critical updates:
- Go to the start menu.
- In the search box type windows update and hit enter.
- Click check for updates on the left-side menu
- If you would like to see any recent updates Windows has automatically installed, click View Update History You may need to restart your computer after installing the updates.
NOTE: Be sure to go back to Windows Update after rebooting to check for any additional updates. You may need to do this several times.
Apple Software Updates
Mac OS 10.8 and later:
- Click on the “Software Update…” option in the Apple Menu.
- The App Store will open to the “Updates” tab and check for updates.
- The App Store will contact Apple, and retrieve information about the latest versions of system software and applications. If it finds newer versions than what you have installed on your computer, it will ask if you want to download and install the new updates. Click the “Update” button. You may be asked to type in your password.
- Some new components require that you accept a “License Agreement“. We recommend you read over each agreement prior to clicking “Accept“.
- Some new components may require you restarting your computer.
- If the App Store does not find any new components it will inform you.
Mac OS 10.7 and earlier:
- Click on the “System Preferences” icon in the Apple Menu.
- In the System Preferences window, select “Software Update“
- In the Software Update window, check the box labeled “Check for updates” and select how often you want it to check (Daily, Weekly, or Monthly).
- In the center of the window, click the “Check Now” button.
- Software Update will contact Apple, and retrieve information about the latest versions of system software and applications. If it finds newer versions than what you have installed on your computer, it will ask if you want to download and install the new updates. Click Continue. You may be asked to type in your password.
- Some new components require that you accept a “License Agreement“. We recommend you read over each agreement prior to clicking “Accept“.
- Some new components may require you restarting your computer.
- If Software Update does not find any new components, it will inform you, and exit.
Repairing Mac OS Disk Permissions
If you have a permissions problem with a file installed by the Mac OS X installer, verifying and repairing your Disk Permissions should help.
- Click command and spacebar to open Spotlight, then type Disk Utility and open it.
- Once Disk Utility opens, select your hard drive in the panel on the left.
- Under the “First Aid” tab, click Repair Permissions.
- The program will check the hard drive for any permissions to repair. If it finds any, it will repair them.
- Once finished, Disk Utility will say “Permissions repair complete”.