Entertainment Centers
Open at all times, but please be respectful of quiet hours.
During the academic year, on-campus residents living in Buchanan Towers, Nash, Ridgeway Kappa, or any of the stacks in Fairhaven Commons have access to our Entertainment Centers (ECs). These centers are setup in the BT and Nash main lounges, Ridgeway Kappa, and in Fairhaven Stack 8.
The ECs are setup so you can plug in any device with an HDMI, VGA, RGB, or RCA output. There is a computer & monitor setup at each EC that has its display mirrored to the secondary display (TV or projector). There is also an AUX cord already setup which can be plugged into any 3.5mm headphone jack to only output sound. The other feature of the entertainment centers is a microphone/receiver set. The cords and microphone can be checked out at the front desk of each respective hall.
Some common uses for our entertainment centers include watching football games, practicing for presentations, gaming tournaments, brainstorming for group projects, movie marathons, karaoke nights, and watching TV. Below is an instructional guide on how to use the entertainment center.
Jump to:
How can we help?
Entertainment Center User Guide
The Controls:
Figure 1: Shows the control panel where Entertainment Center settings are changed.
Glossary of functions for the control panel buttons
Fig 1.1
ON – This will turn on the display (TV/projector), and show whichever input is selected.
OFF – This will turn off the display, be sure to hit this button when you’re done.
NOTE: If you hit the “OFF” button, there may be a startup delay when hitting the “ON” button again causing a delay while the TV/Projector warms up again. This may take a few minutes, so if you need to hide your display briefly use the “PIC MUTE” button.
Fig 1.2
Volume – This knob controls the volume for all inputs. The red light will blink when the max volume is reached.
NOTE: The volume knob has to be turned pretty high to get the sound going.
Fig 1.3
Pic Mute – Shows a blank screen, but keeps the projector/TV on. This is useful when you want to briefly hide a display.
Screen Up – If using a projector, this will bring the screen up. This happens automatically when turned off.
Screen Down – If using a projector, this will bring the screen down. This happens automatically when turned on.
Fig 1.4
PC – Mirrors the display of the PC setup atop the entertainment center. Login with your universal account, and video and audio will be ready to go.
Laptop – This will select the VGA input for visual display and the headphone jack (AUX) input for audio. The VGA/AUX cord bundle can be checked out at the front desk. You may have to adjust your settings to optimize display.
HDMI – Used when any device is plugged into the HDMI cord (laptops, game consoles, blu ray players, etc). This cord is setup at the entertainment center: don’t need your own, don’t need to check one out.
Video 1 – This will select the RCA input (red, yellow, and white jacks). This is most often used with personal gaming consoles (Gamecube, XBOX, PS2, etc).
Video 2 – This will select the RGB Component (red, green, and blue jacks). This is also commonly used for personal gaming consoles (XBOX 360,PS3, etc.).
Cable – Selects the cable receiver. The button will not turn the receiver on, so make sure to do so with the button or remote.
**If the speakers are still not playing any sound, make sure there is enough signal being sent to the speakers (this can be done by playing a prolonged sound clip and making sure the volume is turned up on the device itself). Also check your sound settings to make sure you are outputting audio to the correct device.
The Inputs:
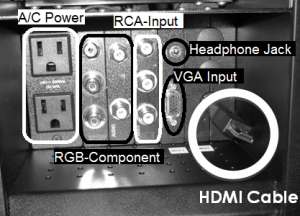
Figure 2: A labeled picture of the input cubby where devices are plugged in.
Connecting Your Audio Device:
- Check out the audio cord from the front desk.
- Plug one end of the cord into your device’s headphone jack, and the other end into the headphone jack, which is located in the cubby.
- Press the “LAPTOP” button shown in Fig 1.4.
- If your device doesn’t automatically play through the headphone jack when plugged in, you’ll have to select headphone in your device’s sound settings.
- Return the audio cord when done
**If you’re still not getting sound try turning up the volume on the entertainment center, it has to be turned pretty high before sound comes out.
Using The Computer:
- Turn the entertainment center on using the “ON” button shown in Fig 1.1, then press the PC input by pressing the “PC” button shown in Fig 1.4
- Login to the computer using your universal WWU username and password
- Use the PC for your entertainment. Some common uses include watching DVDs/Blu Rays, streaming videos, and practicing for presentations
- Log out of the machine and press the “OFF” button shown in Fig 1.1.
**There is a wireless mouse and keyboard available for checkout at the front desk. If you’d like to use them, check them out and turn them on using the switch on the back. If the mouse & keyboard aren’t responding you might have to select the wireless mouse and keyboard in “devices and settings” or restart the computer. If the batteries are dead, the front desk will have replacements. Be sure to return the mouse and laptop when you are finished.
Connecting Your Laptop:
- Check if your laptop has an HDMI, VGA, or Mini Display Port (Mac).
- If your device can connect to HDMI, simply plug in the cord shown in Fig 2. Then press the “HDMI” button shown in Fig 1.4.
- If your computer has a Mini Display Port, there is an HDMI to Mini Display Port adapter (shown on the right) can be checked out at the front desk. Plug the HDMI cord (Fig 2) into one end of this adapter, and the other into your computer. Then press the “HDMI” button shown in Fig 1.4.
- If you need a VGA/audio cable, they are available at the front desk for checkout. Plug one end of the VGA cord into your laptop and the other into the VGA port in the cubby. Then plug one end of the audio cord into the headphone jack of your laptop, and the other end in the headphone jack in the cubby. Finally press the “LAPTOP” button shown in Fig 1.4.
- Configure your settings.
- If using a Windows computer, press the windows key + P to either mirror or extend your display. Then go to your sound settings to select HDMI if you’re using the HDMI cord, or Headphone if you’re using the audio cord.
- If using an Apple computer, go to system preferences: displays to configure your display. Then go to system preferences: sound and select HDMI.
- Turn off the entertainment center and return cords/adapters if you checked them out.
**If you’re still not getting sound try turning up the volume on the entertainment center, it has to be turned pretty high before sound will come from the speakers.
Video Game Consoles:
Although we don’t provide them, feel free to plug in your console to play games, watch movies, etc. If your device has an HDMI input you can plug in the cord shown in Fig 2. then press the HDMI button shown in Fig 1.4.
If your device doesn’t have an HDMI port, you can plug into the RCA jacks (the red yellow and white ones) or the RGB Component jacks (the red green blue/red white ones). These ports are shown (without color) in Fig 2. If you’re plugging into the red yellow and white jacks, press the VIDEO 1 button, and if plugging into the Component jacks, press the VIDEO 2 button (both buttons shown in Fig 1.4).
Using The TV:
- Remove TV remote from designated holder
- Turn on TV
- Press “Home” Button to select application
- Log into Application
- Enjoy your entertainment
- Log out of Application
- Turn off TV
- Place TV remote in designated holder
For more information about Apple Airplay and other functionality, please refer to the TV Guide page.
Sennheiser Microphone and Receiver:
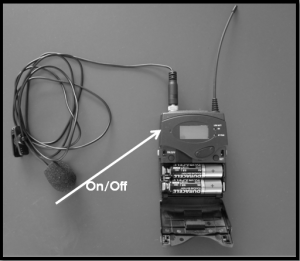
- Check out the microphone from the front desk.
- Turn on the microphone
- On the belt pack there are two buttons on the side that allow you to open the front casing. Make sure to press the two buttons simultaneously to open.
- On the inside, you should see an on/off button. Hold the button down until the display lights up. The belt pack is now on. (mic shown on the right)
- Turn on the receiver
- Inside the cabinet, locate the Sennheiser receiver (shown below). It’s towards the middle-left of the unit.
- On the receiver, there is a button with a light red ring around it. Press the button and hold until the receiver display lights up.
- The microphone should now work.
- Turn off the receiver
- Hold down the on/off button until the receiver turns off
- If the receiver is locked, press down the knob immediately to the left of the on/off button. Then turn the dial to the right until you see “Unlock?” then press down the knob again. You should now be able to turn off the receiver.
- Turn off the microphone
- On the belt pack there are two buttons on the side that allow you to open the front casing. Make sure to press the two buttons simultaneously to open.
- On the inside, you should see an on/off button. Hold the button down until the display turns off. The belt pack is now off.
- Return the microphone to the front desk. Please report any issues.
**The microphone is designed to be clipped near the user’s heart. To change the volume level, adjust the distance between the microphone and your mouth.
**If the volume level still isn’t high enough, turn the dial to turn up the system’s volume.
**Be sure to turn off the receiver first and microphone second to avoid an uncomfortably loud static noise.
**Spare batteries are available at the front desk. If the microphone is still not working, check the mute switch on top of the belt pack.
**If the belt pack is muted, it will say “MUTE” on the belt pack display.
Troubleshooting common problems
- The audio is not playing while a valid input is selected:
- This issue occurs when the audio amplifier is not receiving enough signal to trigger activation.
- Raise the volume of the system by twisting the volume knob until the meter is at its highest point, indicated by a blinking red light.
- If this did not fix the issue, ensure the input is transmitting an adequate audio signal. For example, if you are using the rack PC, your laptop, or another external device, make sure the volume on the device is not muted and at an audible level. If using the TV, make sure the cable tuner is powered on and not muted.
- If the audio is still not playing, contact ResTek.
- A loud static noise is coming from the speakers:
- This issue occurs when the Sennheiser microphone receiver is powered on without the accompanying microphone. If the receiver is not powered on and the noise is still occurring, skip step 2.
- Power off the microphone receiver by pressing and holding the power button on the receiver box until the display changes color and powers off.
- If the noise is still occurring, turn off the entertainment center system by pressing the “OFF” button and contact ResTek.